If you have spent twenty minutes inside the Google Cloud Console trying to figure out why your n8n Google Sheets connection keeps failing, you are in the right place. The Google Cloud Console UI changed significantly in 2026, the OAuth consent screen flow got reorganized, and the exact sequence of steps that worked six months ago now produces a different set of screens — which means a huge number of tutorials are silently out of date.
Add to that the redirect URI mismatch errors that appear when there is a single character difference between what Google expects and what n8n sends, the “Google hasn’t verified this app” warning that blocks the OAuth flow, the test user requirement for external apps, and the 403 access denied errors that show up even after a seemingly successful connection — and you have one of the most reliably frustrating onboarding experiences in automation.
This guide walks you through every step of the current 2026 flow: creating the Google Cloud project, enabling the Sheets API, configuring the OAuth consent screen in the new Google Auth Platform interface, generating credentials, copying the exact redirect URI from n8n, connecting everything together, and fixing every error you are likely to encounter along the way.
What Is OAuth2 and Why Does Google Sheets Use It?
OAuth2 is an authorization protocol that allows n8n to access your Google Sheets data on your behalf without you handing it your actual Google password. Instead, you create credentials in Google Cloud Console — a Client ID and Client Secret — and paste them into n8n. When you authenticate, Google’s servers verify that n8n is allowed to make requests with those credentials, issues a token, and from that point forward n8n can interact with your spreadsheets using that token.
The redirect URI is the key piece of the flow that most people misunderstand. After you authenticate with Google, Google needs to send the authorization token back to somewhere. That “somewhere” is the redirect URI — a specific URL on your n8n instance that receives the callback. If the redirect URI you paste into Google Cloud Console does not exactly match the URL that n8n actually uses, Google refuses to complete the authorization and you get an error.
This is why “redirect URI mismatch” is the most common error in the entire setup. One trailing slash. One http:// instead of https://. One character wrong. That is all it takes.
What You Need Before You Start
A Google account — the account you use to log into Google Cloud Console. This should be the same account (or an account with access to) the Google Sheets you want to automate.
A running n8n instance — either n8n Cloud (app.n8n.cloud) or a self-hosted instance with a publicly accessible URL. For self-hosted setups, this must be running on HTTPS if your Google Cloud project is configured as External. Local development over HTTP requires either using Internal app type or a tunneling tool like ngrok to get an HTTPS URL.
Access to Google Cloud Console at console.cloud.google.com.
That is the entire list.
Step 1: Get Your n8n OAuth Redirect URL First
This is the step that most guides put last, and it is the reason people get stuck. Before you do anything in Google Cloud Console, open n8n and copy the OAuth redirect URL. You need it during the credential creation step in Google Cloud, and if you do not have it ready, you will either have to go back and edit the credential later or — more commonly — paste the wrong URL and spend an hour debugging a redirect URI mismatch.
To find your redirect URL in n8n:
- Open your n8n instance
- Go to Credentials in the left sidebar
- Click “Add Credential” or “Create new”
- Search for “Google Sheets” and select “Google Sheets OAuth2 API”
- In the credential modal, look for the field labeled “OAuth Redirect URL”
The URL will look like one of these depending on your setup:
For n8n Cloud: https://app.n8n.cloud/rest/oauth2-credential/callback
For self-hosted: https://your-n8n-domain.com/rest/oauth2-credential/callback
For local development: http://localhost:5678/rest/oauth2-credential/callback
Copy this URL exactly as shown — including the protocol, the domain, any port number, and the exact path /rest/oauth2-credential/callback. Save it somewhere accessible because you will paste it into Google Cloud Console in a few steps.
Step 2: Create a Google Cloud Project
Open Google Cloud Console at https://console.cloud.google.com and sign in with your Google account.
At the top of the page, click the project selector dropdown (it may show “Select a project” or the name of a currently active project). Click “New Project.”
Give your project a name that makes it identifiable later — something like “n8n Integrations” or “n8n Google Sheets” works well. The project ID is auto-generated but can be customized. Leave the location as “No organization” unless you are working inside a Google Workspace organization.
Click “Create.” Wait for the project to finish creating (usually a few seconds), then make sure it is selected as the active project in the top bar. The project name should appear in the project selector at the top of the console.
Step 3: Enable the Google Sheets API
With your project selected, navigate to APIs & Services using the left sidebar navigation. Click “Library.”
In the search bar at https://console.cloud.google.com/apis/library, type “Google Sheets” and select “Google Sheets API” from the results. On the API detail page, click “Enable.”
This activates the Google Sheets API for your project. Without this step, even perfectly configured OAuth credentials will return API errors when n8n tries to make requests.
If you plan to connect other Google services to n8n in the future — Google Drive, Gmail, Google Calendar, Google Docs — you can enable those APIs now as well. One set of OAuth credentials can be reused across all Google services in n8n, so enabling them now saves time later.

Step 4: Configure the OAuth Consent Screen
This is the step where the Google Cloud Console UI changed most significantly in 2026, and where most current tutorials are out of date.
Navigate to APIs & Services in the left sidebar, then click “OAuth consent screen.” Google will redirect you to the Google Auth Platform overview page — this is the new unified interface for OAuth configuration.
On the Overview tab, click “Get started” to begin configuring OAuth consent.
You will be walked through a multi-step setup:
App name and support email: Enter a descriptive name for your application — “n8n Automation” or your project name works fine. Enter a user support email (your own email address). Click “Next.”
Audience: Choose between Internal and External. Internal is for Google Workspace organizations and limits access to users within your organization. External allows any Google account to authenticate. For personal projects or solo automation setups, select External. For teams operating within a Google Workspace domain, Internal is cleaner and avoids the test user requirement. Click “Next.”
Contact information: Enter the email addresses Google should use to notify you about changes to your project. Click “Next.”
Policy acceptance: Read and accept Google’s User Data Policy. Click “Continue” and then “Create.”
After completing these steps, you will be in the OAuth consent screen management area. In the left-hand menu, select “Branding.”
In the Authorized domains section, add the domain of your n8n instance:
If using n8n Cloud, add n8n.cloud as an authorized domain.
If self-hosting, add your own domain — for example, yourdomain.com (without the https:// prefix and without any path).
For local development, you can skip this step.
Click “Save.”
Step 5: Add Test Users (Required for External Apps in Testing Status)
If you selected External as your audience and your app is in “Testing” status — which it will be by default until you publish it — you must add test users. Google restricts External apps in testing mode to only allow authentication from accounts explicitly listed as test users. Any other Google account attempting to authenticate will receive an “Access denied” error.
In the left-hand menu of the OAuth consent screen area, click “Audience.”
Scroll down to the “Test users” section. Click “Add users.” Add the Gmail address of the Google account you will use to authenticate with Google Sheets. This should be the account that owns or has access to the spreadsheets you want to connect to n8n.
You can add up to 100 test users. Add any additional team members who will need to authenticate.
Click “Save.”
Note: If you are using an Internal app type within a Google Workspace organization, this step is not required.
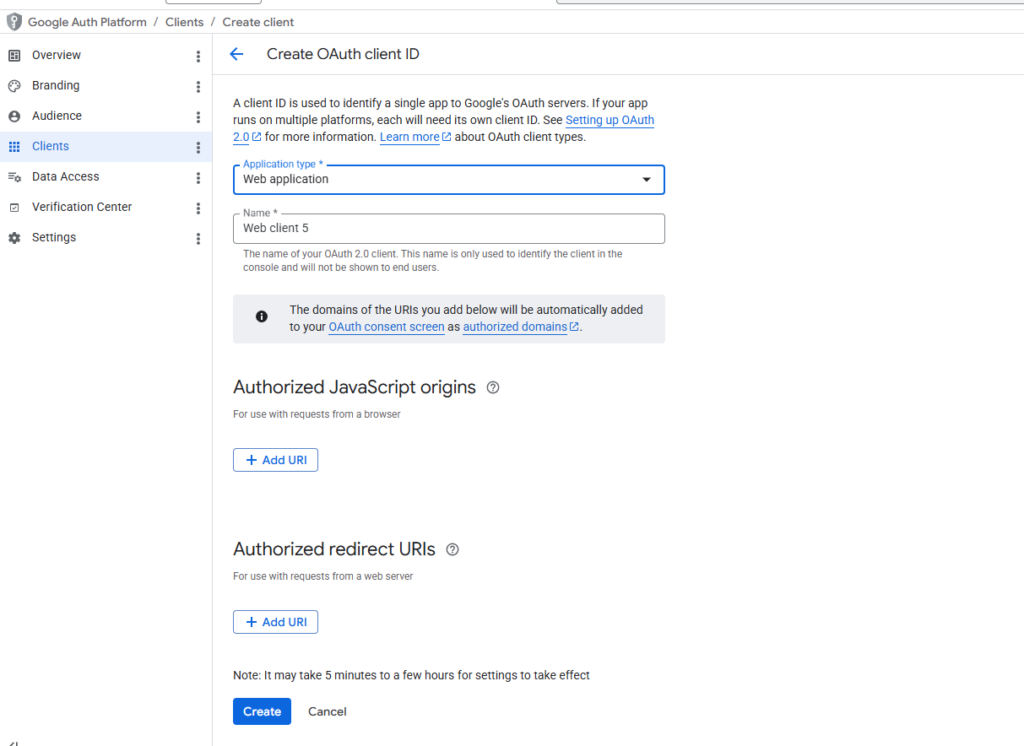
Step 6: Create OAuth 2.0 Credentials
Navigate to https://console.cloud.google.com/apis/credentials or click “Credentials” in the left sidebar.
Click “Create Credentials” at the top of the page and select “OAuth client ID.”
For Application type, select “Web application.” This is the correct type for server-side applications like n8n, even though n8n is not a traditional web app in the consumer sense.
Give the credential a name — something like “n8n OAuth Client” works fine.
Under “Authorized redirect URIs,” click “Add URI.” Paste the exact OAuth Redirect URL you copied from n8n in Step 1.
This is the most error-prone step in the entire setup. The URL must match exactly:
- Include the full protocol: https:// or http://
- Include the port if present: :5678 for local development
- Include the exact path: /rest/oauth2-credential/callback
- No trailing slash after the path
If you are connecting to multiple Google services in n8n (Sheets, Drive, Gmail), they all use the same redirect URL. You only need to add it once.
Click “Create.”
A dialog box will appear showing your Client ID and Client Secret. This is the only time the Client Secret is displayed in full. Copy both values immediately and store them securely. If you close this dialog without copying the Client Secret, you will need to create a new credential — the existing secret cannot be retrieved later.
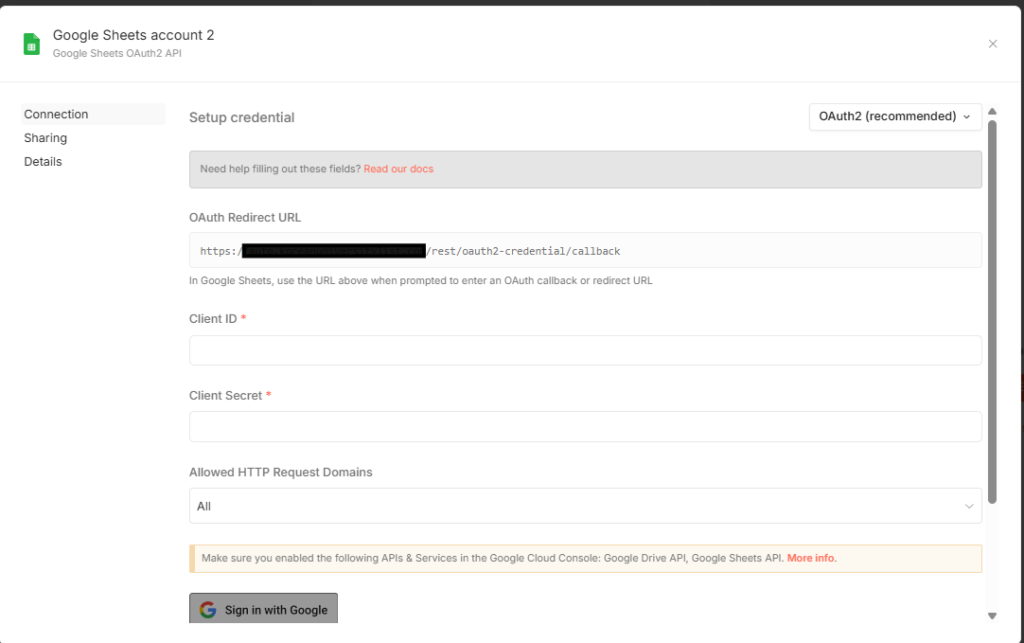
Step 7: Configure the Credential in n8n
Return to the n8n credential modal you opened in Step 1 (or reopen it if you closed it).
In the Google Sheets OAuth2 API credential:
- Paste your Client ID into the “Client ID” field
- Paste your Client Secret into the “Client Secret” field
- Click “Sign in with Google”
A browser popup or redirect will open, taking you to Google’s OAuth consent screen. Sign in with the Google account you added as a test user. Review the permissions being requested — you should see access to Google Sheets (and any other APIs you enabled). Click “Allow” to grant access.
If the authorization is successful, n8n will display a confirmation that the credential is connected. Click “Save” to store the credential.
According to the official n8n documentation at https://docs.n8n.io/integrations/builtin/credentials/google/oauth-single-service/, if you see the warning “Google hasn’t verified this app” during this step, it is expected behavior for apps in testing mode. To bypass this warning: if your app is Internal type, create and authenticate from the same Google Workspace account. If your app is External type, make sure the account you are using is in the test users list. You can click “Advanced” and then “Go to [App name] (unsafe)” to proceed through the warning during testing.
Step 8: Using the Google Sheets Node in n8n
With credentials configured, the Google Sheets node is ready to use. According to the official n8n documentation at https://docs.n8n.io/integrations/builtin/app-nodes/n8n-nodes-base.googlesheets/, the node supports the following operations:
Spreadsheet operations: Create a spreadsheet, Delete a spreadsheet.
Sheet operations within a document: Append Row (create a new row), Append or Update Row (append a new row or update if a matching row exists), Update Row (update an existing row), Get Row(s) (read all rows or filtered rows), Clear (clear all data from a sheet), Create a new sheet, Delete a sheet, Delete Rows or Columns.
To use the node in a workflow:
- Add the Google Sheets node to your canvas
- In the “Credential to connect with” dropdown, select the credential you just created
- Choose your Resource — “Document” for spreadsheet-level operations or “Sheet Within Document” for row-level operations
- Choose your Operation
- For the Document field, select your spreadsheet by URL, by ID, or from a list
- For sheet-level operations, select the specific sheet by name, URL, or ID
You can find the spreadsheet ID in a Google Sheets URL: https://docs.google.com/spreadsheets/d/SPREADSHEET_ID/edit#gid=SHEET_ID
For the “Append or Update Row” operation, n8n offers two mapping modes. Map Automatically mode looks for incoming data fields that match your sheet’s column headers. Map Each Column Manually mode lets you specify exactly which value goes into which column. For most automation workflows, Map Automatically is faster to set up if your field names already match your column headers.
Common Errors and How to Fix Every One
These are the exact errors developers hit most frequently in 2026, with the actual fixes.
“Redirect URI mismatch” error during OAuth
The URL you pasted into Google Cloud Console does not exactly match what n8n sends. Go back to your n8n credential, copy the OAuth Redirect URL again carefully, return to Google Cloud Console at https://console.cloud.google.com/apis/credentials, edit your OAuth client ID, and update the Authorized Redirect URI. Check for http vs https, port numbers, and any trailing slashes.
“Google hasn’t verified this app” warning
This is expected for apps in Testing status. Click “Advanced” then “Go to [your app name] (unsafe)” to proceed. To remove this warning permanently, your app would need to go through Google’s verification process — only necessary for consumer-facing apps, not personal automation tools.
“Access denied” or 403 error during OAuth flow
Your Google account is not in the test users list. Go to the OAuth consent screen in Google Cloud Console, click “Audience,” and add the Gmail address you are trying to authenticate with to the Test users section.
401 Unauthorized on API requests after successful OAuth
The Google Sheets API is not enabled for your project. Go to https://console.cloud.google.com/apis/library, search for “Google Sheets API,” and enable it. You may also see this if you accidentally enabled the API for a different project than the one your credentials belong to — confirm the active project matches.
403 after authentication, with “The caller does not have permission”
The spreadsheet is not shared with the Google account used to authenticate. Either share the spreadsheet with that account, or use an account that already has access.
Refresh token errors or credentials stopping working after a few days
Apps in testing mode have refresh tokens that expire after seven days. This is a Google restriction on unverified external apps. To avoid this, either add your account as an Internal type in a Workspace organization (no token expiry), or switch the app from Testing to Production status in the OAuth consent screen Audience settings. Note: switching to Production does not require Google verification for apps that only access your own data.
OAuth modal in n8n shows only “Sign in with Google” without Client ID/Secret fields
This occurs in some n8n deployments where the simplified OAuth flow is active. To access the full manual configuration, create a new credential, select the credential type, and look for a toggle or link to switch to the full OAuth configuration mode that shows the Client ID and Client Secret fields.
Reusing Credentials for Other Google Services
One important efficiency that saves significant time: you do not need to create separate Google Cloud credentials for each Google service in n8n. The same Client ID and Client Secret can be reused across Google Drive, Gmail, Google Calendar, Google Docs, and any other Google service you connect to n8n.
To reuse credentials, simply create a new n8n credential for the additional service, paste the same Client ID and Client Secret, and authenticate again. Each service will have its own OAuth token stored separately in n8n, but they all share the same underlying Google Cloud OAuth client.
The only requirement is that each API you want to use must be individually enabled in your Google Cloud project under APIs & Services > Library.
Quick Reference: Every URL You Need
Google Cloud Console main: https://console.cloud.google.com
API Library: https://console.cloud.google.com/apis/library
OAuth consent screen: https://console.cloud.google.com/apis/credentials/consent
Credentials (Client IDs): https://console.cloud.google.com/apis/credentials
n8n Cloud redirect URL: https://app.n8n.cloud/rest/oauth2-credential/callback
Self-hosted redirect URL format: https://your-n8n-domain.com/rest/oauth2-credential/callback
Local dev redirect URL: http://localhost:5678/rest/oauth2-credential/callback
n8n Google Sheets node docs: https://docs.n8n.io/integrations/builtin/app-nodes/n8n-nodes-base.googlesheets/
n8n Google OAuth2 single service docs: https://docs.n8n.io/integrations/builtin/credentials/google/oauth-single-service/
n8n Google OAuth2 generic docs: https://docs.n8n.io/integrations/builtin/credentials/google/oauth-generic/
Google OAuth2 documentation: https://developers.google.com/identity/protocols/oauth2
Final Thoughts
The Google Sheets OAuth2 setup in n8n is not actually complicated once you understand what each piece does and why the order matters. The frustration developers hit in 2026 almost always comes from the same three sources: the redirect URI not matching exactly, the authenticated account not being in the test users list, or the Google Sheets API not being enabled for the correct project.
The setup that avoids all of those: copy your n8n redirect URL before touching Google Cloud Console, enable the API immediately after creating the project, add yourself as a test user right after setting the audience to External, and paste the redirect URI with zero modifications when creating the OAuth client.
Once it is working, the Google Sheets node in n8n unlocks a powerful data layer for your automation workflows. Read rows from a spreadsheet to drive a workflow. Append rows to log events, form submissions, or API responses. Use Append or Update Row to maintain running records without duplicates. Connect AI nodes to enrich spreadsheet data and write the results back. The credential setup is a one-time cost. Everything after that is building.